I went through a few tutorials for Renderman for Maya (RfM) last night and I found out some new, really cool stuff. Among other things I also managed to finally (!) understand how DOF works! I also found out the following supercool thingzzz:
1. There is an atribute (this all applies to RfM 1.0) you can add to any poly object that turns it into a SubD at render time, while in Maya is a simple poly that you can tweak and animate and mess with easily. This makes my life so much easier, no more conversions and headaches.
2. That cute little simple translucence you find in any shader, that Maya can't render properly, is rendered beautifully by Renderman. The depth value though seems to have no effect at all, but playing with diffusion vs. specularity values and amount of translucence vs. translucence focus will create cool stuff, like wax and smooth sss look with blazing fast rendering (yeah, not as fancy as real sss, but fast fast fast!). I found that keeping difussion low and translucence high, or viceversa, works well. If you have high translucence, you might also want to have high focus, and shallow focus with low translucence. And then play with specularity for a miriad of different shading looks.
3. IBI, or image based lighting, is really fast now, and I intend to play with it a little more, it includes oclussion, so yo get that for free, with no extra-setup time. Probably occlussion alone can be faster, but maybe not a lot faster. Anyway, having a minimum number of lights helps, like one key light that also shoots shadows (definitely try deep shadows, they're fast and gorgeous), and try to use Spot lights :) So one key light + IBI could mean a really cool render, with occlusion, environment and nice bounce lighting for free. But since it does ray tracing for this, it also automatically ray traces reflective materials, I guess, not sure, which is something I have to look into, because that could slow down rendering. Tweak those reflections anyway, I still have to look into how to use blurry reflections. I tried normal environment lighting and it didn't work, so that's another thing I want to test asap. Now this is exciting for me because I haven't used raytracing much lately, since I started rendering with Renderman.
4. They say instances are more effective than real duplicates, but to me it always looked the other way around, for some reason..... I want to believe instances are cool, but I did a test - rendered 100 textured dragons in a scene (that infamous dragon model that so many renderman users love), simple geometry with simple color map on it, subdivided at render time. It took 1minute 30 seconds in average with normal, unique duplicates, and 1 minute 50 seconds in average with instances. I wonder why? Can anyone reading this care to explain?
5. Keeping the DOF within natural values (that I'm going to explain in a bit) and the area of focus where it logically should be, can produce a really cool photographical render that's also very fast. Exaggerating DOF tends to look weird and unmotivated, and I've see quite a lot of strangely-focused images, where the focus/sharp area seems off, and you're wondering why it's blurry. I think a good, natural DOF should produce a result that wouldn't make the viewer ask "why's that thing blurry?". That being said, I'm sure everyone knows that an extreme value of DOF produces a 'microscopical world' effect, which might be what you need, of course, but be ready for long render times! Also, extreme DOF still doesn't mean you shouldn't focus on the right thing. Last thing - I noticed that close-ups of objects need to have a more aparent DOF, while in a panoramical view it's the opposite, the DOF is almost absent. Well, I need to learn quite a lot myslef about cameras and lenses and cinematography, so this barely scratches the surface.
OK, DOF.
DOF confused me quite a lot in the days when I was trying to understand it using Maya's default renderer and all tests I was doing were blurry and ugly and slooow. Yeah, I could have read something instead of blindly messing with it. But I didn't, unfortunately. Fortunately, now, using RfM, DOF is much faster and easier to explore. And accidentally I just realized how DOF works. Feel free to correct me if I'm wrong, because all this is my own experince and I haven't read a single word of DOF documentation from anywhere. But nevertheless, DOF seems like a very simple thing to handle actually. Working with DOF is working with 2 parameter only. Easy!
1 - Focus Distance: this is the distance [in units] to the center of focus, to the object (or objects) you want to be sharp, basically. So if you have 240 units to your pretty object, type 240 in the Focus Distance. Yes, you have to measure it - there a few ways: by creating a camera with an aim, moving the aim around shows you (in the help line) the distance. By adjusting the Far Clip Plane values to see where it cuts the image (and cut the image where your focused object is), and by rendering at very low shading values with an F Stop value of 1, or 2 , or 3, something narrow like that (while tweaking the Focus Distance). OK, let's explain F Stop.
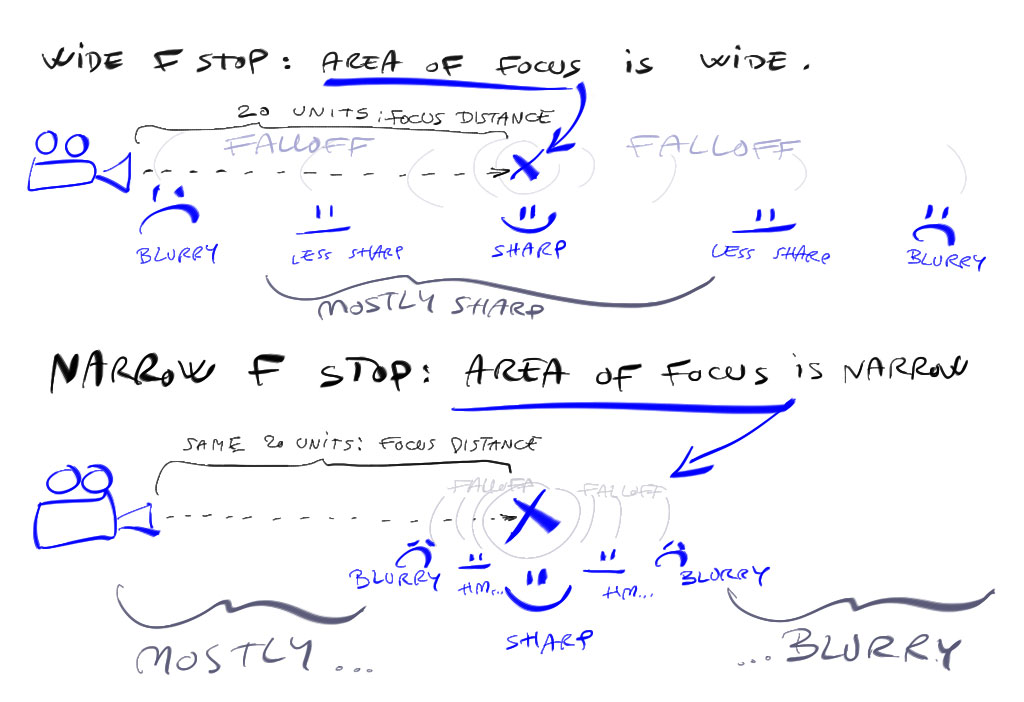
2 - F Stop: this is the falloff around the center of focus. [F Stop = probably Focus Stop, or where the Focus 'stops']. This, I'm not sure, but I think is a relative value (a float). So if you have a value of 3, you have a narrow F Stop (so things get blurry at a very close distance from the focus distance), with a value of 64, you get a wide area of focus. Simple. There is another slider in Maya, called "Focus Region Scale" - this is just a multiplier for the F Stop. So if the F Stop is 64, which is maximum, but you need more, because you have an overall huge scene with mountains and rivers and all kinds of baloonies... you set a multiplier, so if F Stop is 64 and F.R.Scale is 10, you get an amazingly huge F Stop value of 640. Ta daaa...
So if you want a panoramic view, use a very wide F Stop, and the DOF will be extremely subtle (unless you 'take a photo' of a mountain and you also have a flower just 2 steps away from you, in which case, if the focus distance is set on the mountain, the flower will be very blurry, which is normal. But if you change the focus distance to have the flower in focus, then the mountains will become blurry, and to accentuate that, you can also adjust the F Stop to suggest a more microscopical world around the flower, in which case the background mountains become reaaaaaaaly blurry). Here's a drawing to sum it up. Click it for a better view.
 RSS Feed
